From Seed to Salad Bowl

After being cooped up during our endless Wisconsin winters, come spring, kids make eager gardening assistants. Many baby greens and fresh salad veggies have a very short “waiting for reward” period, and can grow and reach maturity in just 30 short days. From seed to salad bowl, families can plant and enjoy their own homegrown salads by the time school lets out for the summer.
From picking out seeds to watering responsibilities, be sure to involve kids in the growing process because any time children have a chance to plant, tend and harvest veggies themselves, they are far more likely to eat them.
Let’s Get Growing!
Planting your own salad garden is quite simple. Planting your own salad garden is generally quite simple, but be sure to read the back of your seed packets for specifics on each plant variety.
Little gardeners are the most eager planters so be sure everything is organized before beginning. We’ve also included a few tips for gardening with kids to make sure that everyone enjoys the experience.
Site Selection
Greens and other spring salad veggies grow well in established in-ground beds, raised beds, or even containers or window boxes. Since their roots are shallow, all leafy salad greens need to grow is six inches of soil. Healthy soil is the building block of a healthy plant, be sure have the kids add a hearty amount of compost to your soil before planting. Keep your eyes out for worms helping the garden grow!
Leaf veggies (lettuce, spinach, kale) only need 3-4 hours of direct sunlight, and root veggies (radishes, beets, carrots) need 4-6 hours, which makes them all great options for a “spring garden area” that is normally shaded once mature, tall trees spread out their leaves. Have children record hours of sunlight for certain locations before planting and use their data to pick the pick spot. (The beauty of containers is they can be moved around, too!)
Planting
For salad gardens, try planting a big, fat row or sections of each veggie rather than a skinny row. Instruct little gardeners to make a claw with their hand and drag it through the soil shallowly, only about ¼ of an inch deep.
For spinach, lettuce and arugula, gently sprinkle the little seeds evenly over the newly-created trench.
For radish and peas, have little gardeners make holes in the trench, approximately one inch apart. Have them wiggle their finger around to identify their first knuckle—holes should only be made as deep as this spot on your little gardener’s finger. Plop one seed in each hole.
To cover seeds, simply pinch or brush the soil over the hole or trench. Do not smoosh or pat down to cover, as this compacts the soil and makes it harder for little seeds to germinate. Remind little gardeners that they want to keep the soil light and fluffy so it’s easy for the baby plants to burst out of the ground!
While early spring rains will help out, it is important for seeds to have constant moisture prior to germinating or sprouting. Provide young gardeners with small cups to water, so eager pours from watering cans don’t wash shallow-planted seeds away. The best motto to teach children about watering is “low and slow.”
Harvesting
The beauty of many salad greens is that, if harvested properly, they can provide the makings of a salad for weeks to come. Simply pick or pinch off the outer, larger leaves on spinach and arugula, or give rows of lettuce or pea shoots a “haircut” with a pair of scissors. Cut only the section needed, leaving 1-2 inches of the plant still growing in the ground. The part that got cut will regrow completely in two weeks and the rest of the row is harvestable in the meantime!
Radishes are a “one and done” plant, meaning once the root (like the radish) is removed from the soil the plant is done and will not regrow. Leaves of radishes are edible, though. Chop and sprinkle leaves to salads for a radish-like zinger.
Seed Selection and Planting
Families can have fun flipping through seed catalogs in late winter to pick out what salad veggies they would like to grow. Below are a few of my favorite varieties for “growing your own salad” at home from Johnny’s Seeds and Seed Savers.
All of the plant varieties listed below are spring or cool season veggies, meaning they thrive in temperatures between 55-75 degrees, but become stressed when the weather is too hot.
Arugula. Pick early for a less peppery flavor or leave a few more days for those who like a more intense bite. It’s a fun experiment to taste what a week of difference makes! Arugula—21 days until baby sized. 40 days to mature.
Lettuce. I recommend growing leaf lettuce rather than head lettuce for salads, as leaf varieties can provide you with a continuous harvest. Encore Lettuce Mix—green and purple, inverting shape leaves make for a fun colorful salad. 28 days to mature.
Pea shoots. The tops of the pea plant are a sweet treat in early spring. Plant a row of peas for their shoots and a row to mature into pea pods.
Radish. Forget red-only radishes, try a multicolored variety for pink, purple and white radishes. Easter Egg Radish—30 days until maturity.
Spinach. Corvair—39 days until maturity.
Sugar peas. Dwarf Gray Sugar Pea—10 days for pea shoots, 57 days for pea pods.
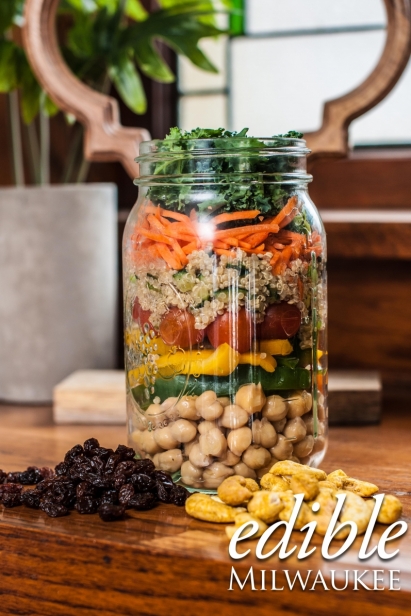
Salad in a Jar
Sometimes kids just need a little fun added to their meals to encourage them to make healthy choices. They will be excited to pick out the ingredients for this salad in a jar and even more excited to shake and eat it!
Salad in a Jar is perfect for whatever leftovers you have laying around, but we’ve included a few layering suggestions below. Stack colorful ingredients and store dressing in a separate container. When tummies are rumbling for salad, pour dressing on top and shake to your heart’s content.
1. Greens: Lettuce, spinach, baby kale
2. Grains or beans: Leftover quinoa, chickpeas, black beans
3. Shredded root veggies: Carrots, beets, radish
4.Dried fruit or nuts: Raisins, currants, walnuts, cashews
5. “Wet” veggies: Chopped tomatoes, peppers, zucchini
Francie’s Not-So-Secret All-Purpose Vinaigrette
- ¼ c. olive oil
- ¼ c. apple cider vinegar
- 1T. Dijon mustard
- 1T. honey
- Salt and pepper